Flutter animation showcase 1: Crafting an elastic bouncing ball tab with canvas
Hey there, fellow Flutter enthusiasts! 👋 Today, I’m thrilled to take you on a journey through one of the most exciting animations I’ve created recently. We’re going to build a dynamic tab bar with a twist — a bouncing ball that creates a dent wherever it lands. Buckle up, because this ride is going to be as fun as it is educational!
The Inspiration
Picture this: I’m scrolling through pinterest, minding my own business, when BAM! 💥 This incredible tab animation catches my eye. A playful ball bouncing from tab to tab, leaving a satisfying dent wherever it lands. I knew right then and there — I had to recreate this in Flutter.

But how? 🤔
Breaking Down the Problem
As I stared at the animation, my mind started racing. I broke it down into smaller, manageable pieces:
- We need a basic structure — a rectangle for the tab bar and a circle for our bouncing ball.
- The dent isn’t just a simple curve — it’s a complex shape that needs to be drawn precisely.
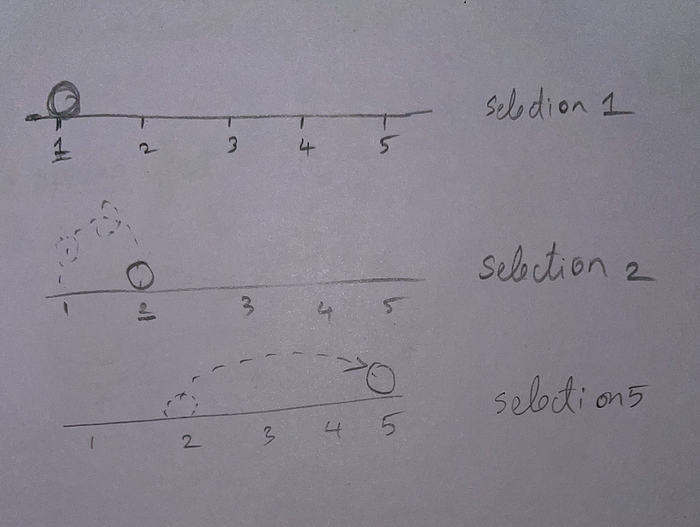
- The ball needs to move smoothly between tabs.
- The dent should animate in and out as the ball moves.
Sounds challenging, right? But don’t worry, we’ll tackle this step by step!
The Journey Begins: Setting Up Our Canvas
Let’s start with the basics. We need a canvas to draw our masterpiece. Here’s what we’re aiming for in our first step:

class CircleRectanglePainter extends CustomPainter {
  @override
  void paint(Canvas canvas, Size size) {
    final paint = Paint()
      ..color = Color.fromARGB(255, 255, 255, 255)
      ..style = PaintingStyle.fill;

    // Draw the rectangle at the bottom of the screen
    canvas.drawRect(
      Rect.fromLTWH(0, size.height - 100, size.width, 100),
      paint,
    );

    // Draw the circle just above the rectangle
    canvas.drawCircle(
      Offset(size.width / 2, size.height - 150),
      25,
      paint,
    );
  }

  @override
  bool shouldRepaint(CustomPainter oldDelegate) => false;
}
This code sets up our canvas with a white rectangle at the bottom (our future tab bar) and a white circle above it (our bouncing ball). Simple, right? But it’s the foundation for everything that follows.
Creating the Dent: A Tale of Two Curves
Now comes the tricky part — creating that satisfying dent. After hours of experimentation (and maybe a few frustrated sighs), I realized the secret lay in using two cubic Bezier curves.

Before we dive into the code, let’s talk about the star of our show: the Bezier curve.
Bezier curves are the secret sauce behind smooth, flowing lines in computer graphics and animations. Want to see them in action? Head over to https://cubic-bezier.com/ and play around! Move the pink and blue control points and watch how the curve changes. This is exactly what we’ll be doing in our code — animating these control points to create the illusion of a moving, curved line.

Now lets draw and animate the two bezier curves so that we can have a nice dent animation.

Check out the dart pad to see this in action : https://dartpad.dev/?id=57274bec615c4b2fb2e1e09bf8b83955
The heart of our dent animation lies in this piece of code:
path.cubicTo(
  animatedStartControlPoint1.dx,
  animatedStartControlPoint1.dy,
  animatedStartControlPoint2.dx,
  animatedStartControlPoint2.dy,
  animatedMiddlePoint.dx,
  animatedMiddlePoint.dy,
);
This single line of code is where the magic happens. Let’s break it down:
- The
cubicToMethod:
cubicTois a method of thePathclass in Flutter. It's used to add a cubic Bezier curve to our path.- A cubic Bezier curve is defined by four points: a start point, an end point, and two control points.
2. The Parameters:
- The method takes six parameters, representing the x and y coordinates of three points:
- The first two parameters (
animatedStartControlPoint1.dx,animatedStartControlPoint1.dy) define the first control point. - The next two (
animatedStartControlPoint2.dx,animatedStartControlPoint2.dy) define the second control point. - The last two (
animatedMiddlePoint.dx,animatedMiddlePoint.dy) define the end point of this curve. - The start point is implicitly the current position of the path (set by a previous
moveToor the end of the previous curve).
3. The Animation:
- Notice that we’re using “animated” points. These points are calculated using
Offset.lerpearlier in the code, which interpolates between two positions based on the animation's progress. - As the animation progresses, these points move, causing the shape of the curve to change smoothly.
4. The Result:
- This curve forms one half of our dent. The full dent is created by two of these curves meeting at the
animatedMiddlePoint.
To visualize this, imagine:
- The path starts at the left edge of the dent.
- It curves down and to the right, guided by the two control points, until it reaches the middle bottom of the dent.
- Another similar
cubicTocall (not shown in this snippet) would complete the right half of the dent.
By animating the control points, we can make the dent appear to grow deeper or shallower smoothly. The animatedMiddlePoint moves up and down, while the control points adjust to maintain a smooth curve.
In the DartPad I’ve provided, you can see this in action. The dent smoothly appears and disappears as the ball “bounces” along the tab bar. This smooth animation is all thanks to the careful manipulation of these Bezier curves.
This approach gives us precise control over the shape of the dent, allowing for a natural, fluid animation that really brings our UI to life!
Now we will add some bounce effect to this animation to make it real.
class FluidCurve extends Curve {
  @override
  double transform(double t) {
    // Custom equation for fluid-like motion
    return -math.pow(math.e, -t * 5) * math.cos(t * 10) + 1;
  }
}
And now we will use this new custom FluidCurve in our animation.

Creating the Bouncing Ball: The Star of Our Show!
Alright, folks! We’ve got our dent animation down, but what’s a dent without something to cause it? Enter our bouncing ball — the true star of this animation extravaganza! Let’s break down the code that brings this little pink performer to life:
void drawCircle(Canvas canvas, Size size) {
  final paint = Paint()
    ..color = Colors.pink[900]!
    ..style = PaintingStyle.fill;

  // Calculate circle position
  final startX = _circlestartPosition.dx;
  final endX = _circleEndPosition.dx;
  final x = lerpDouble(startX, endX, _circleProgress)!;

  // Calculate y position for arc
  final maxHeight = size.height * 0.1;
  final y = size.height * 0.8 - _flattenedSine(_circleProgress) * maxHeight;

  // Draw the circle
  canvas.drawCircle(Offset(x, y), 20, paint);
}
Let’s break it down, step by fabulous step:
- Setting the Stage
final paint = Paint()
  ..color = Colors.pink[900]!
  ..style = PaintingStyle.fill;
First things first, we’re giving our ball a makeover! We’re using a deep pink color (because why not add a pop of color?) and filling it solid. This little ball is ready for its close-up!
2. The Horizontal Hustle
final startX = _circlestartPosition.dx;
final endX = _circleEndPosition.dx;
final x = lerpDouble(startX, endX, _circleProgress)!;
Here’s where we calculate the ball’s x-position. We’re using lerpDouble to smoothly interpolate between the start and end positions. It's like our ball is doing the electric slide across the screen!
3. The Vertical Bounce
final maxHeight = size.height * 0.1;
final y = size.height * 0.8 - _flattenedSine(_circleProgress) * maxHeight;
Now for the bouncy part! We’re using a flattened sine wave (more on that in a sec) to create that satisfying up-and-down motion. The ball starts at 80% of the screen height and bounces up to a maximum of 10% of the screen height. It’s like our ball is on a mini trampoline!
4. Drawing Time!
canvas.drawCircle(Offset(x, y), 20, paint);Finally, we bring our star to life! We’re drawing a circle with a radius of 20 at the (x, y) position we calculated. And just like that, our bouncing ball is ready to steal the show!
But wait, what’s this _flattenedSine business? 🤔
The _flattenedSine function (which we haven't shown here) is our secret sauce for that perfect bounce. It takes our linear progress and turns it into a nice, bouncy sine wave. But we flatten it a bit so our ball doesn't bounce too crazily. It's like giving our ball just the right amount of caffeine - energetic, but not bouncing off the walls!
And there you have it, folks! Our little pink performer is ready to bounce its way into the hearts of users everywhere. It’s amazing how a few lines of code can bring such life to our UI, isn’t it?
Stay tuned as we put all these pieces together for the grand finale of our tab animation
Drumroll, please… 🥁 The Grand Finale!
After all our hard work, it’s time to reveal the final masterpiece! And now, feast your eyes on the fruit of our labor:
Isn’t it beautiful? Our little pink ball bouncing along, creating satisfying dents as it goes. It’s like a digital trampoline for your tabs! 🏀✨
But wait, there’s more! 🎉
For those of you who want to dive deeper, tinker with the code, or maybe even improve it (because let’s face it, there’s always room for improvement), I’ve got a treat for you. You can find the complete source code for this project on GitHub:
https://github.com/amalChandran/flutter-fluid-tab
A Few Notes Before You Go:
- Screen Size Shenanigans: Just a heads up, folks! This animation has been tested on Android and iPhone, but as we all know, the world of screen sizes is vast and varied. You might encounter some quirks on different devices. But hey, that’s part of the fun, right?
- Fixer-Uppers Welcome: If you spot any issues or have ideas for improvements, don’t be shy! Raise an issue on GitHub or, even better, submit a pull request. Let’s make this bouncing ball the best it can be!
- Confidence Booster: I hope this tutorial has given you the confidence to tackle even more complex tab bars. Remember, every great UI is just a series of smaller problems solved creatively. Don’t let the big picture overwhelm you — break it down and bounce your way to success!
A Week of Flutter: 7 Animation Techniques to Try
1 Crafting an Elastic Bouncing Ball Tab with Canvas API

2 Crafting a Shape-Shifting Checkbox Animation
3 From Dribble to GitHub — Building a Rocket Exhaust Effect
4 Crafting Dynamic Intros with Flutter Animations
5 Animating Uber-like 3D Pins for Google Maps
6 Advanced Card Animations using GestureDetector and GLSL Shaders
7 Multi-State Transitions in a Movie Booking App
P.S. If you enjoyed this article, don’t forget to try this and share it with your fellow Flutter enthusiasts. Together, we can make the world of mobile development a more animated and exciting place!

